CIR rating model

CIR does not rate by gut feeling.

CIR looks at what measurably happened in a battle. Not just: “How much damage is shown at the end?”, but also against whom, in which role, with which vehicle, on which map and with which impact.

Fairplay

No live assistance in battle.

CIR is developed with the fair play principles of World of Tanks in mind. The mod is used to collect data for later evaluation. It should not provide aim assistance, prohibited enemy data, automation or tactical live instructions.

Principle

CIR should be understandable, but not reverse-engineerable.

You should be able to understand why an area matters for your battle. But you should not be able to calculate exactly how many points a specific action gives, in order to abuse the system or stat-pad.

Pillar 1

Damage efficiency

CIR does not count damage only as a final sum. What matters is how that damage happened and how it fits the vehicle. Damage against a relevant target, at a suitable distance or against stronger opponents can be classified differently than pure leftover damage.

Show used values
Damage dealt
The actually dealt damage remains the basis, but it is not viewed only as a final sum.
Vehicle comparison
The battle is compared in relation to the vehicle. A light, heavy and TD do not have the same expectation.
Target tier
It matters whether damage was done against lower, equal or higher tier targets.
Hit context
CIR can classify whether hits were assigned cleanly and which hit data is reliable.
Blind shots
Blind shot damage can be considered when it can later be confirmed and assigned reliably.
Enemy HP pool
Damage is also viewed in relation to the available enemy HP pool.
Distance profile
Combat distance can matter because vehicles are designed for different engagement ranges.
Pillar 2

Resilience

CIR does not simply rate: “You got shot at a lot, so that must have been good.” What matters is whether you actually absorbed pressure, prevented damage or held a position effectively. Especially for heavy tanks and frontline vehicles, this can be an important part of battle impact.

Show used values
Blocked damage
Damage that was demonstrably absorbed. It shows that you took pressure without taking the full damage directly.
Received damage
Your received damage is looked at in context. By itself it is not a bonus, but it can matter in pressure situations.
Mitigation
CIR checks whether incoming pressure was measurably reduced so that less enemy impact came through.
Contact pressure
This means real pressure contact in battle, situations where you tie down enemies, block them or absorb part of their push.
Fire binding
If enemies are forced to react to you or focus fire on you, that can create space and time for your team.
Counters after pressure phases
It can matter whether you were able to answer effectively after absorbing pressure, instead of only taking damage passively.
Pillar 3

Support impact

CIR does not rate support as “enemy briefly spotted”. The key question is whether your spotting, tracking or stun actually created team damage. Especially for lights, support heavies or artillery, it must become visible when you enabled impact for others.

Show used values
Spotting assist
Damage that happens because you made enemies visible for your team.
Tracking assist
Damage that happens because your tracking keeps an enemy from escaping or staying protected.
Stun assist
Especially for artillery, measurable team impact can also come through stun.
Official assist value
The official battle value remains the most important basis because it reflects the actual result.
Target timeline
CIR can also classify how a target developed over time and how the support impact came about.
Live detection quality
Live data helps explain the battle, but it does not automatically replace the official battle result.
Pillar 4

Match control

Some actions decide situations without directly creating a lot of damage. CIR therefore uses limited additional values for things that can noticeably influence the course of the battle. This area complements the other pillars, but should not count them twice.

Show used values
Kills
Finishing an enemy can change a situation significantly, even if the final shot alone does not explain everything.
Decap
A base reset can be direct match control because it stops a loss or buys time back.
Cap
Actively contributing to base situations can also matter when it has real impact on the battle flow.
Scouting initiative
This refers to situations where you take initiative and create control or information advantages for your team.
Active presence
Presence does not mean simply staying alive, but being visibly effective during relevant battle phases.
Control situations
These are situations where your actions structurally steer the battle, for example through resets, finishing or initiative.
Example from a real beta battle

How a high CIR rating was created.

This case study explains step by step why the battle received such a high rating. The exact formula remains protected, but it should still be clear which areas were strong, which contributed very little and why the result reached 9,808 CIR.

Hirschkäfer · Ruinberg

Exceptional personal impact despite defeat

Defeat 9.808 CIR

The player moves into a position close to the base early in the battle and stays there for almost the entire match. In this situation that was not passive waiting: the opponents pushed directly into the firing line. The player gained little ground and spotted nobody, but still created very high damage, several finishes and sustained effective presence.

Damage 7.023 well above the vehicle comparison
Share of enemy HP pool ca. 15,2 % removed by one player
Shots 15 13 hits · 11 penetrations
Kills 3 above the vehicle reference
Assistance 82 only a small support contribution
Lifetime 343 / 369 s almost until the end
Enemies spotted 0 no scouting initiative
Base impact 0 no capture or defence points
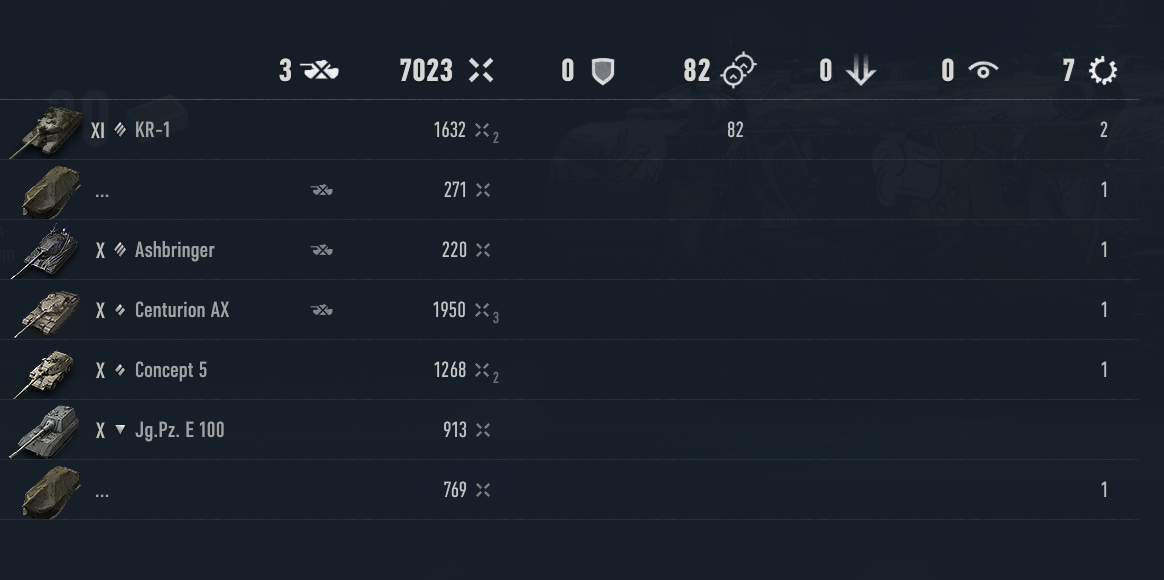
Battle report of the Hirschkäfer example battle Open original image
The battle report confirms the strong direct performance. CIR does not simply copy these values into a finished rating.
From battle report to CIR

Five steps to the classification

The final rating is not created directly from one number. CIR classifies the battle through several consecutive steps.

1
Select reliable data

Postgame values provide confirmed final results. Live data explains additional details such as timing, contacts and activity phases. Uncertain assignments are not treated as confirmed performance.

2
Choose the correct comparison

The Hirschkäfer is not compared with a light, heavy or artillery vehicle. The relevant comparison is based on the available references for this vehicle and the respective map and distance context.

3
Distribute impact across four pillars

Damage, resilience, support and match control answer different questions. A strong damage battle therefore does not automatically become a strong support battle.

4
Treat missing components neutrally

When a reliable reference is unavailable, that component is neither rewarded nor punished. The remaining reliable components can still be used.

5
Combine personal impact

Only at the end are the differently strong areas combined into one overall rating. The team result does not replace the individual battle performance.

S1
Main driver of the rating

Damage efficiency

very strong

Most of the high CIR comes from S1. The 7,023 damage is not treated as just one large final number. CIR classifies how far the battle was above the previous Hirschkäfer level, how much enemy HP was actually removed and at which distances the impact was created.

Damage amount

7,023 damage is clearly above the previous comparison level of the Hirschkäfer. This shows that the result was not merely an average battle with a favourable final phase.

Impact in this example: very high

HP impact

The damage removed approximately 15.2 percent of the entire enemy starting HP pool. One player therefore accounted for a substantial share of all available enemy HP.

Impact in this example: exceptional

Shot conversion

13 hits from 15 shots and 11 penetrations show that most fired shots created actual pressure and damage. Shot volume alone would not be sufficient.

Impact in this example: high efficiency

Distance profile

The impact is classified according to the reliably measured distances at which the damage occurred and how those distances fit the vehicle’s previous profile.

Impact in this example: clearly positive
What does not happen here:

The 7,023 personal damage is not later counted again as support or match control. Each effect should only count in the area to which it belongs.
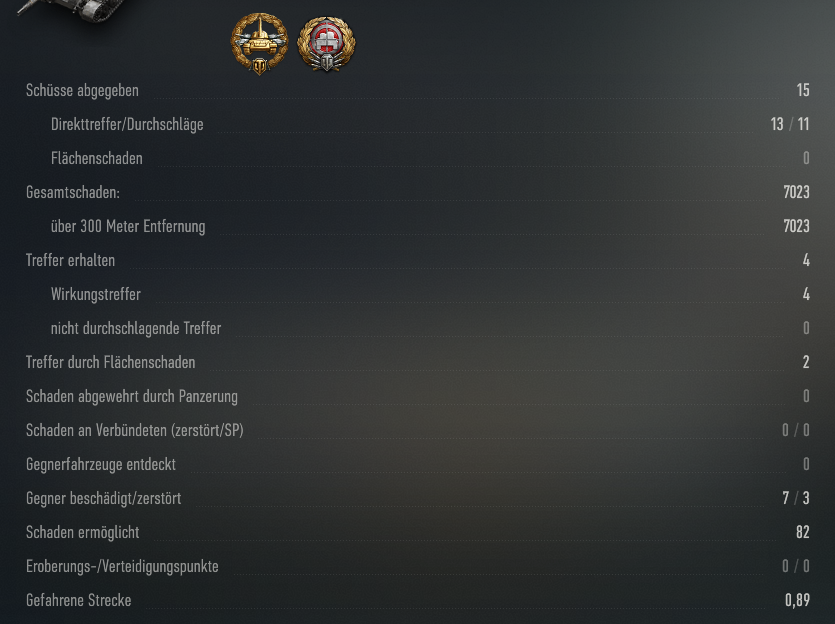
Detailed battle result of the Hirschkäfer Open original image
The detailed battle report shows what created the strong damage efficiency: 7,023 damage from more than 300 metres, 13 hits from 15 shots, 11 penetrations, seven damaged and three destroyed opponents. It also shows which areas contributed little: no blocked damage, no spotting and no base points.
Classification for this match: S1 is the clear main reason for the high overall rating.
S2
Supporting contribution

Resilience

solid

As expected, the Hirschkäfer did not block relevant damage in this battle. S2 is therefore not driven by armour. Enemy pressure, tied-up fire and whether the player continued to create impact remain relevant.

Blocked damage

This area did not contribute to the high rating. Missing blocked damage is not artificially replaced and received damage alone is not a positive value.

Impact in this example: neutral

Fire binding

The enemy push had to react to the held position. This created measurable pressure contact. The positive element is not simply being shot at, but continuing to create impact during that phase.

Impact in this example: present

Counter impact

The player did not merely absorb the enemy push. The held position repeatedly produced hits and damage against advancing opponents.

Impact in this example: positive
Important regarding positioning:

Little movement does not automatically mean passive play. Holding the position was effective because the opponents moved into the firing area. Movement is not rewarded by itself.

Classification for this match: S2 supports the rating but is not the main driver.
S3
Low contribution

Support impact

low

This battle was extremely strong in personal damage, but not in support. The 82 assistance therefore remains only a small side contribution. The 7,023 personal damage is not counted again inside S3.

Official assistance value

The confirmed 82 assistance points provide the reliable basis. Compared with the rest of the battle performance and the vehicle reference, this value is low.

Impact in this example: low

Assistance type

Spotting, tracking and stun assistance have different profiles. They are only classified as effective support when confirmed team damage actually resulted.

Impact in this example: barely relevant

Support HP impact

This area only considers how much enemy HP the team could remove through enabled assistance. The player’s own 7,023 damage explicitly does not belong here.

Impact in this example: very small
Classification for this match: S3 explains only a small part of the overall rating.
S4
Strong additional contribution

Match control

strong

S4 looks at effects that influence a battle but should not simply be counted as damage again. In this example the important contributions mainly come from the three finishes and the long, effectively used lifetime.

Finishing

Three kills are above the vehicle’s typical finishing performance. The current system evaluates kill count relative to the vehicle. Remaining HP or the danger of individual targets is not yet weighted separately.

Impact in this example: strong

Mission impact

No capture or defence points were created. The battle therefore receives no additional contribution from base situations.

Impact in this example: zero

Scouting initiative

Initiative is currently based on spotted opponents. Because no opponent was initially spotted, this area remains at zero. The limited movement is not the reason.

Impact in this example: zero

Active presence

343 seconds alive out of 369 initially only show that the player remained available almost until the end. That alone is not enough for a strong presence rating.

Impact in this example: strong
What exactly does active presence mean?

CIR does not track where you are positioned on the map or where you drive. Your lifetime is only divided into short time periods.

  • Each period is checked for reliable personal battle activity, such as shots, hits, damage dealt or assistance.
  • Periods with detected activity count more strongly. Quiet periods can receive reduced consideration so that short gaps between actions are not immediately treated as complete inactivity.
  • Simply surviving without detected activity is not enough for a high presence rating.

In this example the player remained in the battle almost until the end and repeatedly created measurable impact. The fact that the Hirschkäfer stayed in the same place for a long time is neither rewarded nor punished. Movement and map position are not part of this rating.

Classification for this match: S4 increases the rating through finishing and effective presence.
Team result and personal impact

Why the defeat does not erase the performance

CIR does not use victory or defeat as a blanket multiplier. A battle is not automatically good because the team wins and not automatically bad because the team loses. Measurable individual impact remains decisive.

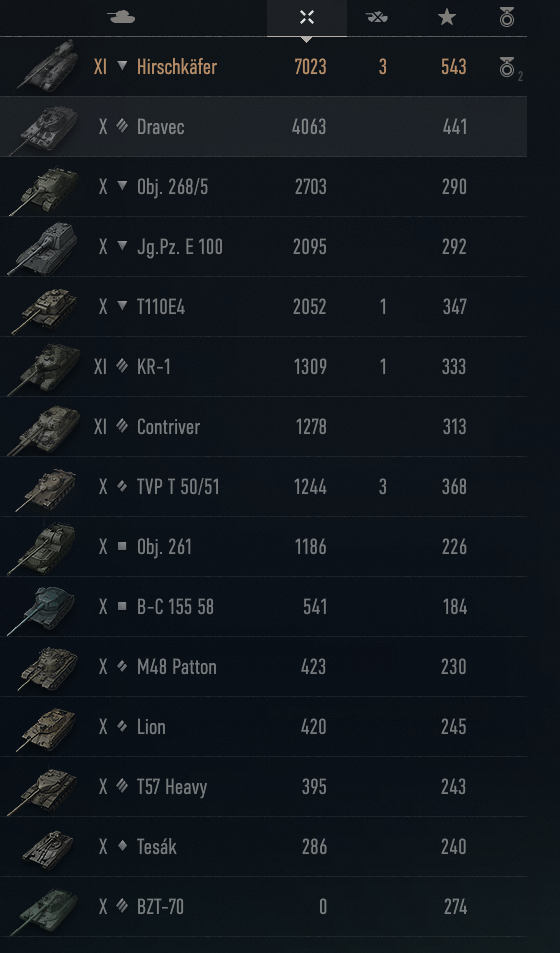
Result of the player team Open original image
The individual result was clearly above the other damage values on the team. This confirms the exceptional personal battle but is not itself the calculation basis.
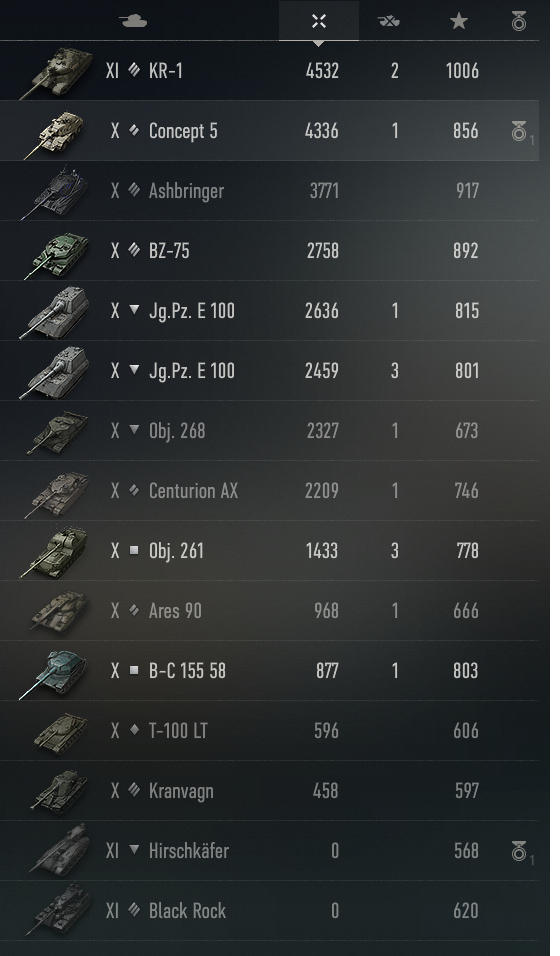
Result of the enemy team Open original image
Several opponents produced strong results and the enemy push decided the battle. This explains the defeat without retroactively erasing the Hirschkäfer’s personal impact.
Typical critical questions

What experienced players will want to know

Why is the CIR higher than the damage dealt?

CIR is not renamed damage. The rating combines damage efficiency, pressure impact, support, finishing, mission impact, initiative and active presence. Battle values are therefore transformed into comparable impact areas.

Is high damage counted multiple times?

No. Direct damage primarily belongs to S1. Assistance only counts when other players could deal damage through spotting, tracking or stun. S4 evaluates finishing and presence rather than counting the same damage total again.

Why is there presence impact despite little movement?

Movement is not automatically impact. Holding an effective position can be more useful than unnecessary driving. What matters is whether active or tactically held periods were detected during the player’s lifetime.

Why is initiative still zero?

The current initiative component evaluates scouting. Because no opponent was initially spotted in this battle, no contribution is created. Positioning and counterfire are represented through other areas.

Why is there no blanket defeat deduction?

One player does not control the performance of fourteen teammates. A blanket deduction would systematically devalue strong individual impact in weak teams. Unachieved battle objectives still provide no additional contribution.

What happens when references are missing?

The affected component remains neutral. It is treated neither as zero performance nor as a bonus. The rating continues to rely on reliable components, so one missing detail reference does not block the entire battle.

Why can early beta values fluctuate more?

New vehicles and individual maps initially have only a small comparison base. During beta, references are intentionally used early so the full chain can be tested. With more battles, individual outliers have less influence and values stabilise.

Can CIR be manipulated through stat padding?

Individual high totals are not automatically sufficient. CIR separates different types of impact, uses vehicle and context comparisons and limits certain additional contributions. For now, the exact formulas deliberately remain protected so the system cannot be played through a fixed point list.

Overall classification

Very high personal impact is not the same as a victory.

The rating is mainly this high because of the exceptional damage performance. Three kills, sustained active presence and a smaller contribution from pressure and counter situations were added. Assistance, scouting and base play contributed almost nothing.

This is what CIR should make visible: not only that a battle received a high rating, but why. The battle was not strong in every area, but it was exceptional in the areas that mattered most here.

When reliable data or comparison values are unavailable for individual components, CIR treats them neutrally and relies on the remaining dependable components.
Beta

Values can change.

The calculation is not final during beta. Weights, references and thresholds can be adjusted when real battles show distortions or unstable results.

Classification

One battle, not the player.

CIR evaluates one round based on measurable values. Newer players see where impact happened. Very strong players see whether high final numbers were also strong in vehicle and map context.

Technical limit

Only use reliable data.

New components are only used more strongly once they can be detected reliably and evaluated fairly. Unclear details are not presented as certain truth.